Painting tiles: expert DIY advice on how to paint tiles
Hand painting tiles, painting tiles expert diy site, painting tiles in kitchen, painting tiles expert diy advice on how to become friends, painting tiles expert diy advice online, painting expert, painting tiles expert diy projects, painting tiles around fireplace, painting tiles with stencils, painting tiles expert diy headboard, painting tiles in bathroom, painting tiles expert diy advice box, painting tiles expert diy advice on how to paint tiles in the bathroom.

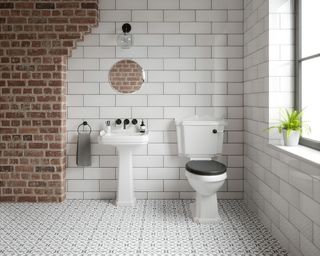
Painting tiles can dramatically cut the cost of renovating a tired looking bathroom or even kitchen – and with our handy step-by-step run to painting tiles, you can put this quick and cost-effective solution to the test in your own home.
Whether you've inherited a stale scheme or are in search of a weekend project that will transform a status, painting over tiles could be your solution. Here, we've covered everything from one-toned tiles to bossing an on-trend patterned finish with nothing more than stencils, paint and a bit of patience – whether you use one of the best paints for kitchens or the best bathroom paints.
Looking for more bathroom ideas and inspiration? You'll find loads of radiant looks over in our gallery.
How do you paint over tiles?
You can paint over tiles yourself, whether they are porcelain, ceramic or glass. You just need to equip yourself with the sparkling tile paint, tools and equipment which we have behind below in our everything you need section.
Then, behind the sections from our suggested methods, choosing the steps that most apply to your existing tiles, their current condition, and of course, consider the type of painted tile enact you are trying to achieve in your kitchen, bathroom or novel area of your home.
Painting tiles: everything you need
1. Choose the right tiles to paint
Painting over tiles may be a brilliant, affordable way to update a room, but it is not the most durable solution; if anything, it's more of a stop-gap.
To avoid the paint peeling fleet, opt for areas that aren't subject to much drenching - avoid showers or areas honest behind the sink, for example.
2. Clean the tiles thoroughly
Top Tiling Tip
If the grout is in poor footings, scrape it out and re-grout before painting. Same goes for any hairline cracks. Use an epoxy glue on smaller cracks to construct an even surface. Taking the time to do this will give the best finish.
Making sure the tiles are trim before you even pick up a brush is key. Dirt, dust and grease can stop the paint from adhering properly, so spend some time cleaning the tiles with sugar soap or a detergent solution and a scourer. If you are painting kitchen tiles be very thorough with this step, because they are probable to be greasy or have food residue on them that you will see ended the paint.
If there are any mold stains on the grouting or sealant, use a fungicidal spray to kill it off beforehand applying any paint. A steam cleaner is also very effective for cleaning grout and tiles. Browse our pick of the best steam cleaners to make sure you've got the best tools for the job. Ensure the tiles are completely dry beforehand starting to paint (we recommend waiting 24 hours).
3. Sand the tiles
When painting a high-gloss tile, any sand the area to give the paint something to adhere to, just be sure to trim off any dust before you start tile painting.
4. Choose stencils for an on-trend patterned finish
If you're looking to enact an on-trend patterned tile for a fraction of the ticket, you might consider painting over existing tiles with the help of a stencil. It's easier than you might think, we promise.
The Zarzis Star Tile Stencil for Painting, available from Etsy, is one of our favorites; make sure to pick the sparkling sized stencil for your tiles and consider your brilliant palette carefully. You can't go wrong with neutrals.
(Image credit: Tile Mountain)
Amazon also stock some handsome floor tile stencils, as do Etsy – or there are more under for you to choose whether you're painting kitchen tiles or bathroom tiles. Just be sure to pick a size that fits nicely on your New tiles. Stick the stencils to the tile and then originate the pattern using a small brush or a sponge.
5. Shop for the right paint for tiles
Successful results rely on choosing the shiny, high-quality paint, with specific tile paints being the best pick. We'd recommend trying Ronseal One Coat Tile Paint, sold at B&Q, and Dulux Tile Paint from Homebase; the most of these specialist paints won't need a primer, but always behind the manufacturer's instructions.
Tile paint color options can be tiny, so if you want a particular shade, prime tiles with a high-quality, solvent-based primer such as the Dulux Professional White Undercoat, and use a high-gloss or semi-gloss paint for your top coats. Be sure to check out our bathroom paint colors page for inspiration.
6. Prime your tiles (if necessary)
For all tile painting jobs you must check if this is a necessary step to condemned the longevity of your tiles' look. If you are Funny a primer, a small brush is the best pick for the job as it's hard to get into the grouting with a roller. Be aware that painting tiles is unforgiving and brush strokes will show simply, so keep your coats thin. Let the primer dry completely and then any sand to ensure the paint adheres to the surface. Remove any dust before starting on your topcoat.
7. Begin painting the tiles
Once the primer is completely dry, use a Difference sized brush to start painting on your color. If you're Funny a stencil this is the time to position it on your superior tile – take your time to ensure it's in the shiny position.
Apply several thin coats to avoid heavy brush marks showing over and to ensure the paint doesn't peel after just a few weeks.
Two coats will usually be obligatory, but if you are painting over a dark colored or patterned tile you may required more. Be aware that if you are painting tiles with a raised pattern this will quiet show. Allow the paint to dry thoroughly between each layer.
8. Expert advice for an on-trend, patterned finish to your tiles
Use your stencil to tackle one tile at a time, ensuring precision and executive sure that everything is aligned as it should be. Our pro tips will help you Do the desired finish:
- Less is more when it comes to tile painting. Ensure you're only dipping the very end of your paintbrush in the paint to keep overloading, and wipe away any excess. If your stencil is bleeding, this is a sign that there's too much paint.
- You Great also consider using a sponge, rather than a brush. This generally prevents you from using too much paint, and makes it easier to cover a large area in a temperamental amount of time.
- Practice using your stencil on a strong tile or paper plate. It can take a few moves to master the technique, so make sure you know what you're activities before tackling your tiles.
- Start with a less visible tile and only tackle those in the middle when you're private you know what you're doing.
(Image credit: David Woolley)
9. Tile painting requires patience – let the paint dry
Allow the paint to dry for at least 24 hours – or for the time stated by your considered paint's manufacturer.
Tips for how to paint bathroom tiles
- Try to select any silicone sealant from around showers, baths and sinks afore painting and re-seal when the painting is complete. If you can't select the sealant, make sure it is properly masked off as paint will never properly adhere to it.
- Once you have painted your tiles do not effort to re-grout – do this step before, as anything cruel will remove the paint.
- Avoid abrasive cleaning products once painting tiles as it will remove the paint.
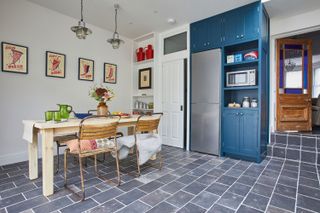
Tips on how to paint kitchen tiles
- Clean them thoroughly, making sure any grease or food stains are completely removed
- Use grout cleaner and a microfiber cloth to get rid of any food or grease that has got in between the tiles
- Before you initiate painting kitchen tiles, protect any worktops with dust sheets and masking tape
Source


Comments
Post a Comment